The GNOME Project released GNOME 49.5 today as the fourth point release of the latest GNOME 49 “Brescia” desktop environment series with more bug fixes and improvements.
FOSS Force’s Top Ten for March
Here’s what people were reading the most on FOSS Force during the month of March, 2026.
The post FOSS Force’s Top Ten for March appeared first on FOSS Force.
Apertis v2026: A modern foundation for industrial embedded development
Apertis v2026 is here, bringing a significantly modernized foundation for industrial embedded development. Based on Debian 13 (Trixie), this release delivers updated system libraries, development tools, compilers, and core services, alongside a new default Wayland compositor, a reworked SDK, and smarter packaging pipelines. The result is a more capable, maintainable platform designed to meet the long-term stability and security requirements of industrial products.
How to Switch Between TTY Screens Using the Chvt Command on Linux
The chvt command is an essential Linux built-in utility to help you switch between different TTY screens (or virtual consoles) from the command line interface.
Superman Supertucking for April Fools’ Day on Zwift
This is our 12th April Fools’ Day on Zwift, and each year ZHQ has come up with something fun for the community.
A Quick Review
In 2025 we all got a Pocket Scotty, which became an ongoing feature the next day. In 2024 we ironically wore VR Goggles, and before that it was two years of special April Fools’ Day events. 2021 saw us big wheeling, 2020 saw us transported to 1989, and 2019 we smelled burning rubber. The year before that it was Paperboy. In 2017 we had big heads, 2016 gave us the old-timey effect, and in 2015 we rode big wheels on Jarvis.
This year Zwift has a new surprise – they’ve swapped out the supertuck rider position for the superman! (Apologies for the low-quality images… I’m traveling and trying to get shots from a low-powered laptop…)

How To Be Super(wo)man
To get into the new Superman position on Zwift, five conditions must be met:
- You must be on a standard road pr gravel bike frame (no Tron, TT, or MTB)
- You must be traveling at least ~36MPH (~58km/hr)
- The gradient’s decline must be at least -3%
- Your power output must be below 11 watts
- You must be out of the draft and not riding in a pack (safety first!)
- It has to be April 1st (local time)
Zwift will automatically place your avatar in the superman position if all these conditions are true. You come back out of the superman once any of these conditions is not met – for example, if the road flattens out to a -2% decline.
While I can’t recommend attempting this position in real life, I can promise you it’s possible:
There’s even a tutorial video. But don’t blame me if you try this and it doesn’t go well for you:
Your Thoughts
Based on this April 1st fun and recent images from the Pas Racing Series, it appears Zwift has worked up some new avatar poses/positions. What other avatar postures would you like to see? (I want a victory wheelie.) Share your thoughts below!
OpenVPN 2.7.1 Released with New Features, Improvements, and Bug Fixes
OpenVPN 2.7.1 has been released today as the first maintenance update to the latest OpenVPN 2.7 series of this open-source software for connecting to virtual private networks (VPN).
Gaim 3 Is In Development For Restoring The Original Gaim Instant Messaging App In GTK4
Gaim! Any desktop Linux users from 20+ years ago likely remember the Gaim instant messaging app that was commonly shipped by desktop Linux distributions for interfacing with different instant messaging platforms like AIM, MSN, ICQ, etc. About twenty years ago Gaim was renamed to Pidgin though due to the AOL Instant Messenger trademark. But with the AIM trademark since expired and wanting to take a differing approach from the latest Pidgin, Gaim 3 is under development…
AerynOS 2026.03 Brings GNOME 50, Other Wayland Compositor Updates
AerynOS 2026.03 is now available as the newest release of this from-scratch Linux distribution originally known as Serpent OS. With this month’s update comes GNOME 50, KDE Plasma 6.6.3, and various Wayland compositor updates alongside other software improvements…
Seeed Studio reTerminal D1001 Targets HMI Systems with ESP32-P4 and Integrated Display
Seeed Studio has launched an 8-inch HMI device combining a touch display, wireless connectivity, and multimedia hardware in a single platform. The reTerminal D1001 pairs an ESP32-P4 with an ESP32-C6 for networking, along with a 6-axis IMU for motion sensing. The system is powered by the ESP32-P4NRW32, a dual-core RISC-V processor operating at up to […]
MidnightBSD 4.0.4 Released With Aged & Agectl For Age Verification/Attestation
MidnightBSD 4.0.4 is out today as the newest update to this desktop-minded BSD operating system. Notable with this update is introducing the Aged daemon and Agectl program for handling age verification and age attestation given the increasing number of US states pursuing laws around age verification at the OS user level…
xx-fractional-scale-v2 Aims To Improve Wayland Fractional Scaling
A merge request for Wayland Protocols was opened today for introducing “xx-fractional-scale-v2” as an experimental protocol to address current shortcomings with current Wayland fractional scaling. There is also a KDE KWin compositor merge request already out for review that implements this xx-fractional-scale-v2 protocol…
Servo 0.0.6 Released With Many Great Improvements
Servo 0.0.6 is out today to round out the month with many great improvements made in recent weeks to this Rust-based browser engine advancing with its servoshell implementation and many prospects around using it for embedded browser use cases…
Major Arc Raiders Flashpoint Update Expands Game With New Missions And Loot

A new major Arc Raiders update, Flashpoint, is going live later today. The Flashpoint Update is the third of four Escalation updates, following Shrouded Sky in February and Headwinds in January. Flashpoint is introducing a new map condition, a new vaporizer drone enemy, new “Wasp Hunter” cosmetics, a new player project to build a High Gain
Google Drive’s AI Security Upgrade Detects Ransomware And Prevents File Corruption

A great benefit of cloud storage is the ability to automatically store backup data off-site, but ransomware can be a serious problem to that approach, since if it too is synced off-site, the entire cloud backup may be useless. Google recognizes this, and since September of 2025, has been working on addressing that shortcoming of Google Drive
The Document Foundation Calls on Europe to Break Free from Proprietary Software
The Document Foundation, creator of LibreOffice, urges Europeans to adopt open source solutions and reduce dependence on proprietary software and major technology platforms.
iPhone 18 Images Show Major Design Shift With New Display And Camera Layout

Rumor has it Apple is planning to freshen up its iPhone lineup with a new design language. Its upcoming models will reportedly receive a makeover, with several leakers indicating that there are going to be changes to the camera and Face ID setup on the front of iPhone 18 devices, starting with the iPhone 18 Pro.
The Dynamic Island, which
New Rust-Based BUS1 In-Kernel IPC In Development For The Linux Kernel
After KDBUS failed to make it into the mainline Linux kernel more than one decade ago as an in-kernel version of D-Bus, BUS1 was proposed as a clean sheet design for in-kernel, capability-based inter-process communication (IPC). BUS1 didn’t gain enough traction to make it to the mainline kernel and then many of the same developers devised Dbus-Broker as a more performant D-Bus user-space implementation. Well, as a big surprise now, a new version of BUS1 is being worked on for the Linux kernel…
Micron May Stack GDDR Like HBM For A Major Graphics Memory Capacity Boost
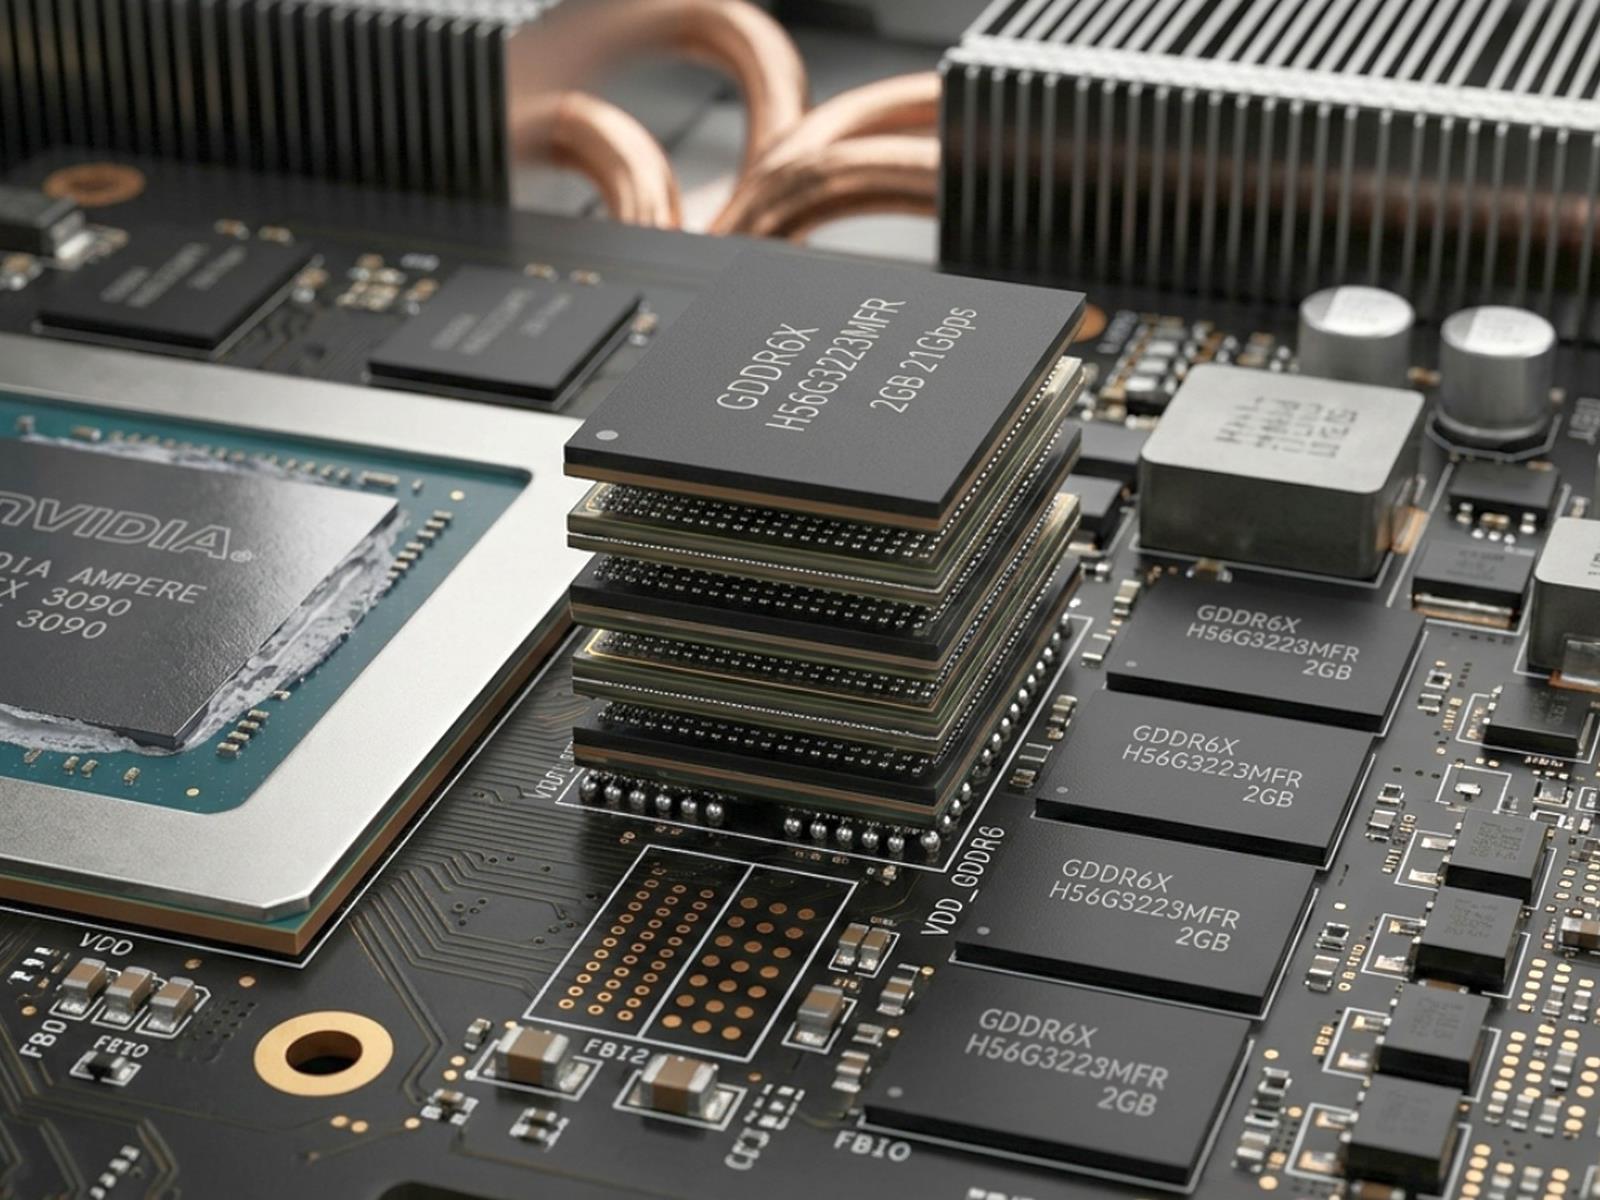
As the global AI boom continues to fracture the traditional semiconductor supply chain, manufacturers are searching for novel ways to increase memory density and throughput without the astronomical cost of flagship HBM solutions. According to ETNews, Micron has commenced development of a new product that will stack GDDR chips in a vertical
Anthropic goes nude, exposes Claude Code source by accident
Oopsy-doodle: Did someone forget to check their build pipeline?Would you like a closer look at Claude? Someone at Anthropic has some explaining to do, as the official npm package for Claude Code shipped with a map file exposing what appears to be the popular AI coding tool’s entire source code.…